

Spring is here and it’s time to get those tomatoes in the ground! Well, it’s actually mid-May, but here at 3,000 feet elevation, we’re crossing our fingers and starting our summer gardens. The kids at Cobb Elementary School are definitely Rock Star Gardeners. They grew these plants from heirloom seeds in our very own greenhouse! Together we put 21 plants in the ground, which will feed the students and provide for the cafeteria in the fall.
Tomato plants are funny little guys, who have to be planted just right. Follow these 10 simple steps and you’ll be harvesting buckets of the finest tomatoes around!
How to Plant Tomatoes Like a Rock Star!
Tomato plants are actually vines that grow all crazy! They need both space and support for when they get huge, so it’s worth it to have a good plan. Before you even buy the plants, decide how you will trellis (support) them as they grow. Fence trellising is great because you can plant densely and efficiently (think commercial growers), though you need quite a bit of space. Most of us are more familiar with using tomato cages in the home garden. I have found most cages you can buy are too small to support tomato plants when they are giant, so we build our own. We use 6 ft. fencing, bent into a circle, with cut-out’s for reaching in and harvesting the tomatoes (make sure you wrap all loose pieces of wire so no one gets scraped!). We also cut the bottom wire off, leaving small “spikes” for sticking in the ground. You can see an example a little further down the page.
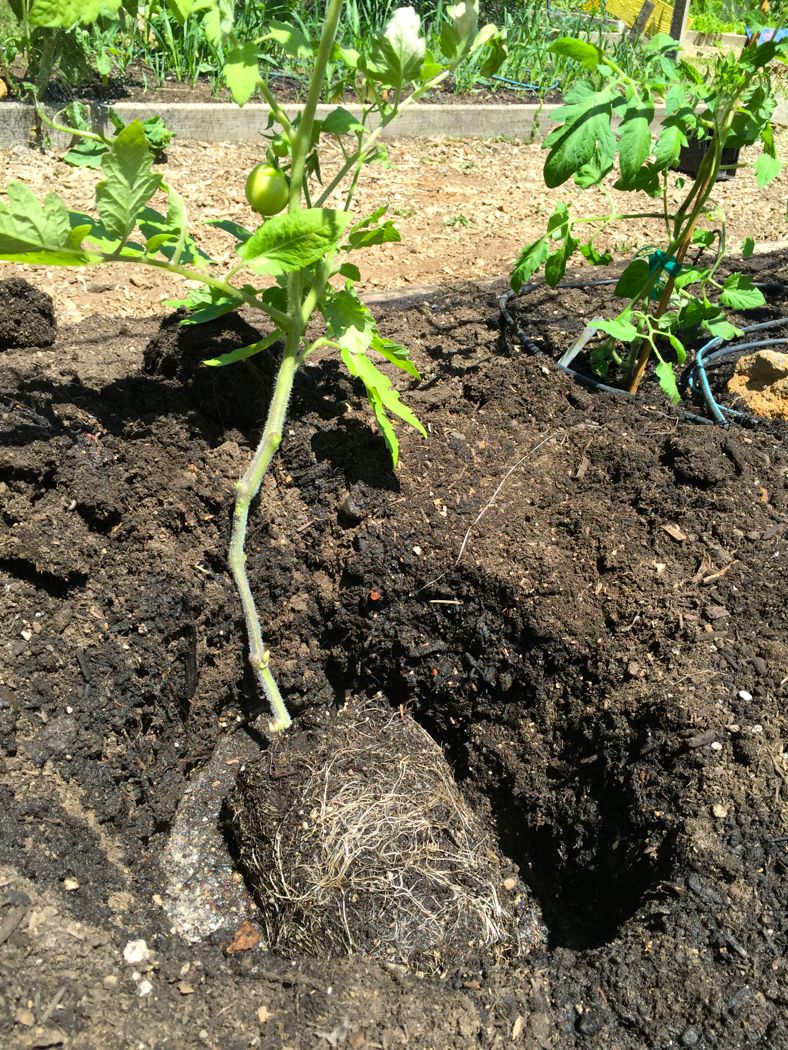
Tomato plants like to support themselves by growing roots from their stems. See all those fuzzy hairs and little nobs coming out of the stem in the picture below? All of them want to become roots! In order to establish a super-strong root system, tomato plants need to be buried deep in the ground.

1. Plan it Out
Always start by setting the plants out first, it is much easier to move them around while they are still in pots. If planting along a fence, space the plants 3 feet apart on each side of the trellis, and 1 1/2 feet offset, through the trellis. If you are using tomato cages for support, space the plants according to how wide the cages are, plus a little room between for harvesting (2-3 ft should be just fine).

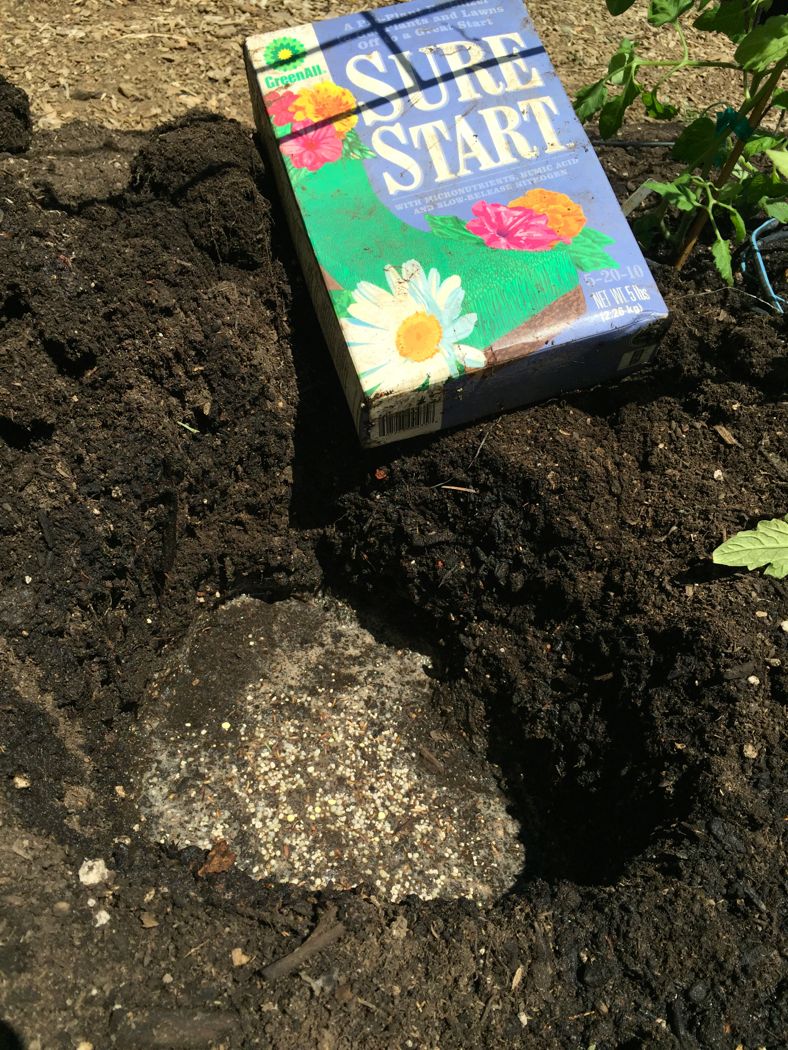
2. Prepare the Hole
Tomatoes need to be planted very deep, so dig a hole that is much wider and deeper than the pot. In a perfect world, you would want to have 2/3 of the plant buried in the soil, though sometimes that isn’t possible. Do the best you can. Once the hole is dug, fill it with water to wet the soil. Dry soil could steal moisture from the roots and send the plant into shock. I like to amend the soil in the hole with Sure Start, which is an organic fertilizer designed to promote root development and growth during planting time. Follow the directions on the box, and mix it into the soil well. If I’m planting paste tomatoes (“Romas” or “San Marzano’s”), I add finely crushed egg shells to further boost the calcium (helps prevent blossom-end rot).
3. Prepare the Plant
Remove the branches and leaves from the bottom of the plant, so it can be buried nice and deep.


4. Put the Plant in the Hole
Remove the plant from the container, and gently loosen the roots. Lay the plant in the hole on it’s side and bend the stem up towards the trellis. Planting it on it’s side like this will help the plant develop a strong root base.
5. Tuck It In
Tomato plants need to be tucked in gently and thoughtfully. Wet the roots and soil, and carefully begin to bury the plant. Repeat watering after every few inches of soil, and do another layer of Sure Start before you finish covering it. As you mound the remaining dirt around the stem of the tomato plant, build a temporary well to hold water.

6. Water Well
The first watering on planting day is crucial to keeping your plant from getting stressed. You have already made sure the soil around the roots is very wet, now fill the well around the stem several times to ensure a thorough watering.

7. Provide Support
Tomato plants need be supported as they grow. You can trellis them on a fence, or support them with a cage, depending on the size of your garden or personal preference. Secure the branches with plant tape, then gently weave the stems in and out of the support.


8. Pruning
As the tomato plants begin to grow and bush out, consider pruning the “suckers”. This limits the greenery, while encouraging the growth of the main stems. Well pruned plants concentrate more on fruit development, which is exactly what we’re after. The suckers grow between the stem and the leaf, at a diagonal. Pinch them off while they are little!

9. Companions and Mulch
Over the next week, I will continue to add “companion plants” to the tomatoes, then cover the entire bed with a thick layer of straw mulch. Companion flowers, like zinnias and marigolds, attract beneficial insects to the area, while peppers and basil are thought to make the tomatoes more flavorful. Plants tucked in somewhat closely will also help provide shade for the roots. Mulch shades the roots as well, and lessens water evaporation.
10. Water and Wait
Tomato plants need about an inch of water per week, keep it consistent to prevent blossom-end rot (the nasty brown spot on the bottom of the tomato). Consider cutting off the water entirely after the fruit has set. This is a technique called “dry farming” that deliberately stresses the plant. This stress forces it to grow it’s roots deeper, and send all of it’s energy to develop the fruit (to create the seed, to pass on life). Dry farmed tomatoes are smaller, fewer, but more magically flavorful than you can imagine! Depending on weather conditions and how far along your plants are, you should be harvesting glorious tomatoes in about 2 months.
Other than a little fertilizer along the away, you’re all set to be enjoying BLT’s and caprese salad later this summer. The kids at Cobb School will be delightfully plucking and enjoying a rainbow of cherry varieties all through the fall.


